
|
|
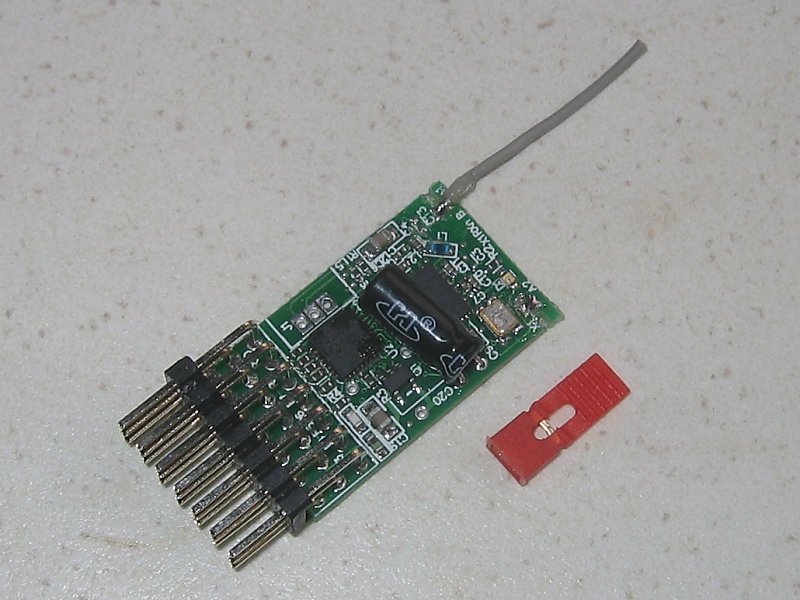
Rx102-22 Instructions (v266)
|
 |
 |
1. DESCRIPTION:
5 channel Receiver with servo outputs. Compatible with DSM2 Surface and Air transmitters.
Ch2 is used for Selecta so only channels 1 and 3-6 are available for use.
Intended for use with Tx22 usually with an external ESC.
2. SELECTA:
Selecta allows models to be brought in and out of service via the radio without touching them.
Outputs ‘hold’ last position immediately the receiver becomes 'not selected' and you regain control 1 second after being reselected.
On signal loss, outputs go to their failsafe positions except for Pin2 and Pin7 which continue to hold to provide 'cruise control' with Tx off.
3. CONNECTIONS:
Pin1: Ch1 - Throttle with Tx22 and joystick transmitters.
Pin2: Ch1 - as per Pin1 but 'holds' last position on failsafe (for cruise control with Tx off).
Pin3: Ch3 - Direction switch on Tx22 and alternate Throttle on joystick transmitters (spring-loaded stick).
Pin4: Ch4.
Pin5: Ch5 - Bind button on Tx22.
Pin6: Ch6.
Pin7: Ch3 - as per Pin3 but 'holds' last position on failsafe (for cruise control with Tx off).
4. FAILSAFE:
Outputs go to failsafe positions on startup.
Outputs ‘hold’ on short signal loss (<4s).
Outputs go to failsafe positions after 4s sustained signal loss (except Pin2 and Pin7).
Failsafe positions are learned during binding.
Hold positions are learned immediately before signal loss or when Rx is deselected with Ch2 (Selecta).
5. LED:
Led On = perfect reception (real-time indicator).
1 flash = Scanning (~2sec between flashes; wrong model if never stops).
2 flash = Brownout (receiver voltage went too low; check battery/servo load).
3 flash = timeouts (accumulation of short signal failures).
4 flash = failsafe (signal lost for >4s eg: Tx switched off before Rx).
5 flash = watchdog (program recovery mechanism; should never happen).
6. JOYSTICK TRANSMITTERS:
Although intended for use with Tx22, it can be used with a joystick transmitter using the Ch2 trim to select models.
Each model is 'active' when the trim is within a 7 click range (3 clicks left and right of the position memorised during binding).
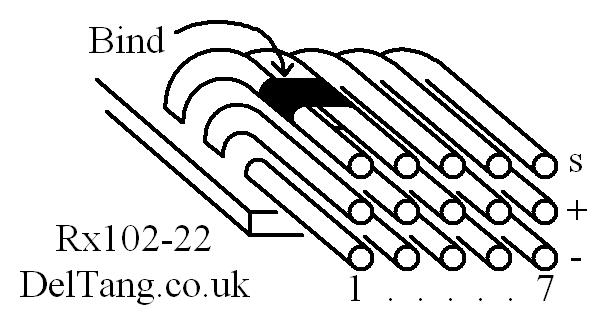
7. BINDING:
Binding and memorising servo Failsafe and Selecta switch positions:
1. Put bind plug on bind pins (signal pins 1 & 2) and switch Rx on. Led will flash rapidly. Remove bind plug at any time.
2. Choose a Selecta switch position and put other channels in their failsafe positions on the Tx (Throttle closed).
3. Hold Tx bind switch and switch Tx on. Led will flash twice a second for several seconds.
4. Bind is complete when Led stays On. Channel positions are memorised as the Led comes on solid.
If Led does not come on within 10sec or continues flashing every 2sec (=scanning) the bind has failed. Switch Tx and Rx off, move them closer or further apart and retry. Binding is most reliable when no other RC 2.4 Tx’s are on.