
|
|
Prog3 Programmer
|
DESCRIPTION
Prog3 is used to change settings in DT receivers.
Prog3 is a self-contained programming tool but setting programming codes is less easy than Prog4.
Prog4 creates a wireless link between a computer and receiver for changing settings with a text file.
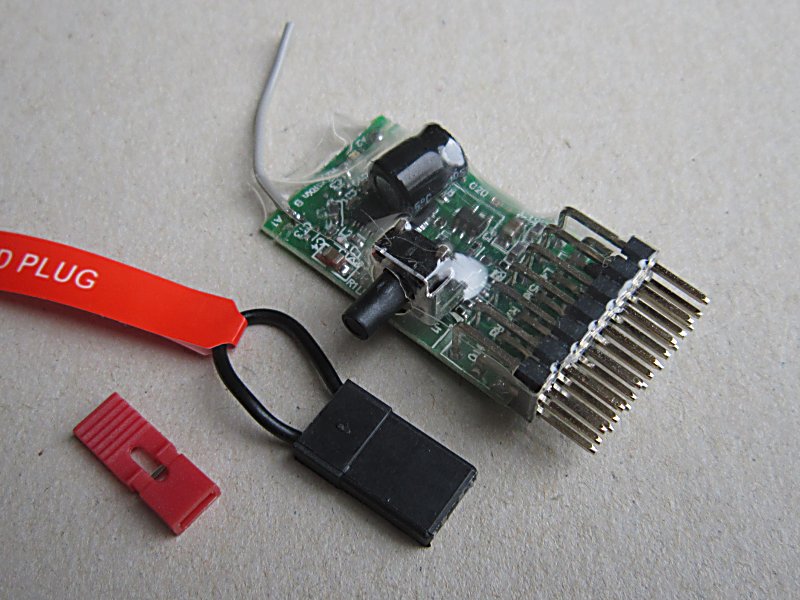
PINS & PLUGS
Pins 1-5 on Prog3 represent one row in the programming tables.
Each pin is set individually. The plugs make the led flash a number for each Pin.
Each pin can be set to 0-18 flashes. Each value is flashed twice. The '0' setting has a very brief flicker.
The large plug increases the flash count if placed across the top signal pin and bottom negative.
The small plug decreases the flash count if placed across the top signal pin and middle positive pin.
1. Switch everything OFF (Prog3, Receivers, Transmitters).
2. Switch Prog3 ON.
3. Place a large or small plug on one pin to reveal the setting associated with that pin.
4. If the plug is kept on the flashes will increase or reduce.
5. Remove plug to stop them changing.
6. Press Button to save or switch Prog3 off to discard changes.
BUTTON
The Button on the side of Prog3 has three functions:
1. If it is being pressed when Prog3 is switched on, it makes Prog3 start binding.
2. Once Prog3 is on, when pressed it saves the values associated with each Pin. This replaces any values saved previously.
3. Once Prog3 is on, when pressed it also causes the values associated with each Pin to be transmitted to the receiver.
Each time you press the button the values will be saved and transmitted again.
BINDING
Prog3 needs to be bound once. Your receiver will still remember the bind info for your proper transmitter:
1. Switch everything OFF (Prog3, Receivers, Transmitters).
2. Switch the Receiver ON and wait ~20s for it to enter bind mode (led rapid flash).
3. Press and hold the Button on the side of Prog3 and switch it ON. Both led's should flash slowly.
4. The Receiver led should display 3-flash if successful. The Prog3 led will come on solid.
USAGE
Prog3 acts as a surrogate transmitter.
When Prog3 is ON and the Receiver show a 3-flash, the Receiver is in programming mode.
To avoid unintended changes, keep the Rx off while making changes to Prog3 pin flashes.
1. Switch everything OFF (Prog3, Receivers, Transmitters).
2. Switch Prog3 ON and set an appropriate number of flashes for each of Pins 1-5 to represent one row in the programming table.
3. Switch one Receiver ON and wait for the Receiver led 3-flash.
4. Press the Button on Prog3 briefly to save and transmit the changes.
5. The led on the Receiver flashes fast for 1s if it accepts the changes (no special flash if the values are not accepted).
6. Switch Prog3 and the Receiver OFF before trying to use it with a proper transmitter.
TIPS
* Prog3 can be powered with 3.2-10v on any +/- pin.
* Prog3 transmits continuously so switch it off when not needed.
* The small plug must never be placed over positive and negative pins as this will make smoke!
* Settings are saved when you press the Button. They are also transmitted at that time so you should only press the Button when you are ready. If you want to save your settings but not update the receiver, switch the receiver off before pressing the Button on Prog3.
PROGRAMMING STRUCTURE
The structure for programming changes are shown on the 'Programming' page for each receiver found using the links below. Each output or feature occupies one row in the table. The whole row (up to 5 columns) is programmed at one time. If a column is not used, the number of flashes for that Pin on Prog3 can be anything. If one row is used for more than one feature, they must all be set at the same time.
The receiver board ID (eg: 60a) is printed on the PCB.
The version of the software is usually hand-written on the largest black chip on the receiver. If there are more than two numbers, use the first two numbers (top/left).
| Version | Marking | Rx60b | Rx61b | Rx61c | Rx62a | Rx63a | Rx65a | Rx65b |
| 610-x | 10x |
v610 |
v610 |
- |
v610 |
v610 |
v610 |
- |
| 611-x | 11x | - | - |
v611 |
v611 |
- | - |
v611 |
| Version | Marking | Rx41d-x-v5 | Rx43d-x-v5 | Rx45-v5 | Rx45-5-v5 | Rx45-22-v5 |
| 510-x | 10x |
v510 |
v510 |
v510 |
v510 |
- |
| 511-x | 11x | - | - | - | - |
v511 |
| Version | Rx102 | Rx105 |
| 110-x |
v110 |
v110 |