
|
|
Prog1
|
DESCRIPTION
Prog1 is used to change settings in DT receivers.
Prog1 allows changes in real-time while the receiver is being controlled with its normal transmitter.
Prog1 is a self-contained programming tool but setting programming codes is less easy than Prog4.
Prog4 creates a wireless link between a computer and receiver for changing settings with a text file.
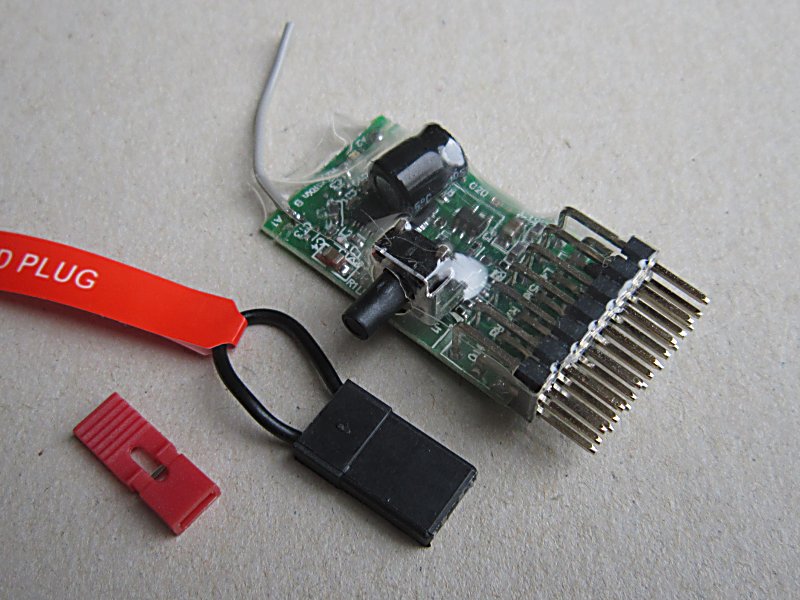
PROG1
PROG1 is a converted receiver. Each pin is used to make the led flash a number for that pin. Each pin represents a column in a programming table (see 'Programming Structure' section below). One row in the table is programmed at a time.
* Pins 1-5 are used for Columns 1-5 in the tables.
* Pin6 is used to set an optional unique ID for each Rx (it is best to ignore this initially).
* Pin7 is for a 3.2-10v battery.
* The button on the side is used to save changes to pin flash numbers and to transmit the new settings to the Rx.
OPERATION
Two 'bind plugs' are provided (they are called bind plugs due to their origins; they are not used for binding).
The large plug is used to increase the number of flashes and the small one to reduce them:
The large plug is always used on the top signal pin and bottom negative.
The small plug is always used on the top signal pin and middle positive pin.
The small plug must never be placed over positive and negative pins as this will make smoke!
The led is on solid when you switch the device on. If you place either plug on pins 1-6, the led will flash its current setting twice and then increase or decrease. Remove the plug when the correct number of flashes is displayed. The led is mainly off with a '0' option (there is a small flicker if you look carefully).
Settings are saved when you press the button. They are also transmitted at that time so you should only press the button when you are ready. If you want to save your settings but not update the Rx, switch the Rx off before pressing the button on Prog1.
Prog1 transmits for 3 seconds. The led on the Rx flashes fast during that time if the settings are accepted. The led on the Rx will do nothing or go into a repeating flash sequence if the change is not accepted. Switch the Rx off and on to clear that and try again. This should happen when you select a sequence of settings that are not valid for the row being changed.
PIN6 - PROGRAMA ID (Optional)
The Programma ID is an advanced feature. It is best to ignore 'Pin6' until you become familiar with the tool.
Each Rx is given a 'Programa ID' when you bind. This is set with Pin6 on Prog1. The default is '0'. It can be used to ensure you only change settings in one Rx at a time. Prog1 can set numbers from 0-18. If you keep this the same for each Rx, you should only have one Rx switched on when you make programming changes.
To change the Programma ID:
1. Use Pin6 on Prog1 to set a unique Programa ID (and record what you have used for each Rx).
2. If you are going to Bind next, press the Prog1 button briefly to save the new ID.
3. If you are going to make programming changes next, set the other Pins to appropriate values.
BINDING
You have to bind Prog1 with each Rx you want to use it with. You normally only have to do this once per Rx.
To bind:
1. (Optional) Set a unique Programa ID on Prog1 as described above.
2. Switch Prog1 off.
3. Switch the Rx on and wait for it to enter bind mode (led flashing fast).
4. Press and hold the button on Prog1 while you switch it on.
5. Release the button and wait for led to stop flashing.
6. Binding is successful if the led flashes on the Rx become more 'deliberate' for a few seconds (about 0.5s per flash).
7. The Rx will then search for its normal Tx and the led will flash once every 2s until it finds it (and then come on solid).
MAKING PROGRAMMING CHANGES
To change settings in the Rx:
1. Switch the Rx and Tx on and get that working in a familar manner. The led on the Rx should be on solid.
2. Switch Prog1 on. It's led should come on solid.
3. If different Programa IDs are being used for each Rx, set this using Pin6 as described above.
4. Use Pins 1-5 to set an appropriate number of flashes for one row in the programming table.
5. Press the button on Prog1 briefly to save and transmit the changes.
6. Release the button and wait for led to stop flashing.
7. The led on the Rx flashes fast for 3s if it accepts the changes.
8. You may need to switch the Rx off and on to pick up the changes.
PROGRAMMING STRUCTURE
The structure for programming changes are shown on the 'Programming' page for each receiver found using the links below. Each output or feature occupies one row in the table. The whole row (up to 5 columns) is programmed at one time. If a column is not used, the number of flashes for that Pin on Prog1 can be anything. If one row is used for more than one feature, they must all be set at the same time.
The receiver ID (eg: 60a) is printed on the PCB.
The version of the software is hand-written on the largest black chip on the receiver. The first two numbers are most relevant if there are three numbers. For example:
* '10' means v610
* '03' with a '2' below that means v603
* '02' with a '2' below that means v602
|
Software Version |
Rx60a | Rx60b | Rx61a | Rx61b | Rx63a | Rx62a | Rx65a | 10 |
- |
v610 |
- |
v610 |
v610 |
v610 |
v610 |
03 |
v603 |
v603 |
v603 |
v603 |
v603 |
- | - | 02 |
v602 |
- |
v602 |
- | - | - | - | 01 |
v601 |
- |
v601 |
- | - | - | - |