
|
|
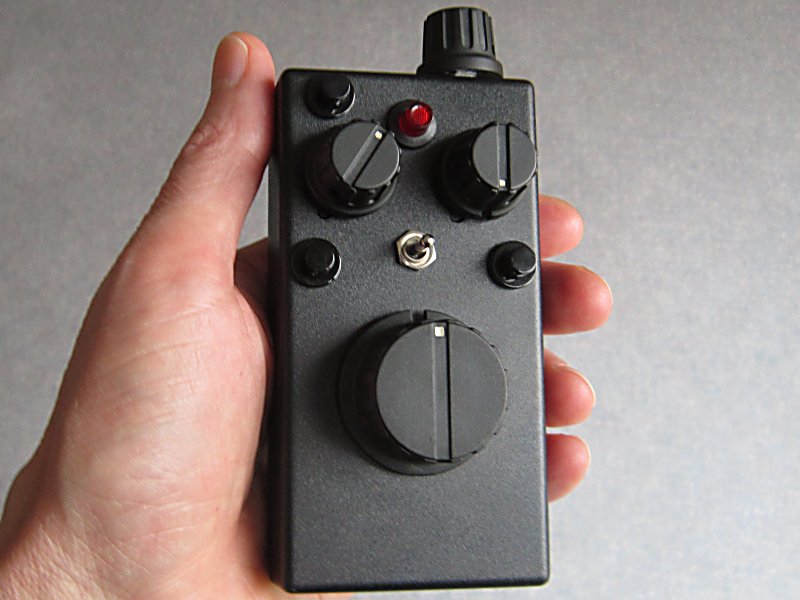
Tx72 Transmitter
|
 |
 |
DESCRIPTION:
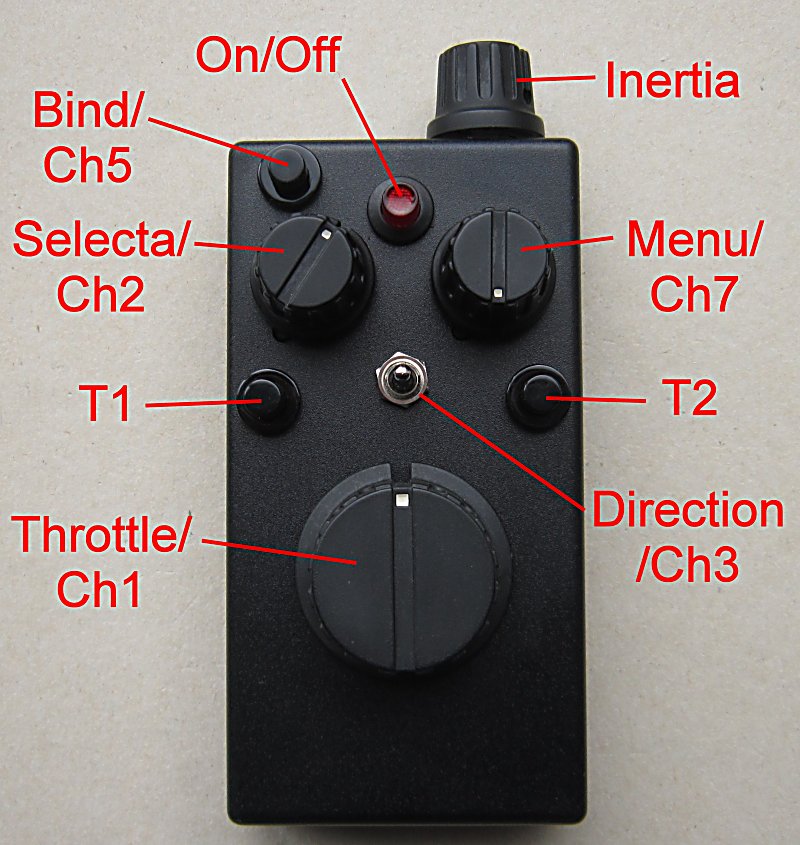
Tx72 is a hand-held wireless transmitter intended to control up to 12 model railway train engines.
It has controls for Speed, Direction, Inertia, Lights, Loco selection and Menu control.
SPEED / THROTTLE:
300° rotary control with 'center click'.
Full rotation is either 'low off' 0-100% motor control or 'center off' (depends on receiver).
The Speed knob controls Channel 1 and Channel 6.
DIRECTION / LIGHTS:
The Direction switch is used to select forward/reverse with receivers that have 'low off' motor control.
This switch can control lights instead of direction with receivers that have 'center off' motor control.
The Direction switch controls Channel 3.
INERTIA / MOMENTUM / BRAKE:
Inertia 'dampens' or slows down changes to Throttle (Ch1 and Ch6).
The Speed knob sets a 'target' and Inertia changes throttle slowly until it reaches that target. The Led flickers while a change is in progress.
To stop quickly Throttle and Inertia must be in the 'off' position. Inertia is off when turned fully anti-clockwise (CCW).
ON/OFF:
Tx72 has an illuminated push-button on/off switch. It is best to switch Tx72 on before the receiver.
The Led flickers slightly while an Inertia transition is in progress.
The Led flashes more boldly when Binding.
SELECTA:
12-way rotary switch with positions matching those of a clock.
Allows 12 locos to brought in and out of service without touching them (requires Selecta enabled receivers eg: Rx6x-22 and Rx102).
The Selecta knob controls Channel 2.
MENU:
12-way rotary switch and T1/T2 trigger buttons.
The Menu feature is controlled with these switches but the 'cleverness' that makes things happen only resides in certain receivers. The menu feature also has to be enabled manually in each receiver using the 'Paperclip' change method. The Menu switches control Channel 7.
BIND:
If a receiver has not previously been bound, it has to be 'paired' with Tx72. Binding is only required once per receiver.
1. Put your receiver into Bind mode (switch it on and wait for led to flash fast).
2. Choose the Tx72 Selecta switch position for this loco.
3. Press and hold the Bind button on Tx72.
4. Switch Tx72 on and then release the Bind button.
5. Binding is complete when the Led stops flashing.
COUPLING/LIGHT:
Once the Tx is switched on, the Bind button acts as a simple switch.
TECHNOLOGY:
Tx72 uses the 2.4GHz band which requires no frequency channel control and is very resilient against interference.
The Binding process ensures that your receivers will only obey your Tx72. Any number of receivers can be bound to your Tx72.
Range is suitable for indoors and small outdoor sites.
COMPATIBILITY:
Tx72 is compatible with all DSM2 receivers. This includes all DelTang receivers.
The Direction/Light switch will ony have any effect with receivers that have these capabilities.
The Selecta switch will ony have any effect with receivers that have Selecta enabled.
The Menu switch will ony have any effect with receivers that have Menu enabled.
BATTERY:
Tx72 is powered with a standard 9v PP3 battery.
It has some bare wires inside so care needs to be taken when installing the battery to avoid short circuits.
WARNING:
The following describes advanced features...
ALTERNATIVE FUNCTIONS:
Tx72 is sold with the Inertia knob set to control Inertia as described above (default).
This knob can be set to control Ch5. This gives greater control of Ch5 than with the Bind button.
This knob can be set to control Ch4. This gives control of an extra channel AND allows Tx72 to 'program' some DT receivers.
BIND BUTTON FUNCTIONS:
The Bind button is used as follows:
* If the Bind button is being pressed when the Tx is switched on, the Tx will enter Bind mode (described above).
* If the Bind button is pressed for less than 20s at any time, it will normally control Ch5 (see Notes below).
* If the Bind button is pressed for 20s or more within the first 60s of switching the Tx on, it will perform Calibration (see Tx72-Kit).
* If the Bind button is pressed for 20s or more after the first 60s of switching the Tx on, it will toggle what the Inertia pot is used for.
TOGGLE INERTIA KNOB FUNCTION:
To toggle what the Inertia pot is used for:
1. Switch Tx72 on and wait 90s without touching the Bind button.
2. Press and hold the Bind button.
3. After ~20s the Led will go out for 2s and then come on for 3s. Release in this time to select Ch4.
4. After ~25s the Led will go off and stay off until you release the Bind button. This selects Ch5.
5. Repeat steps 1 to 3 to revert to Inertia control.
NOTES:
* If the Inertia pot is being used for Inertia, the Bind button controls Ch5 when pressed for less than 20s (default).
* If the Inertia pot is being used for Chan4, the Bind button controls Ch5 when pressed for less than 20s.
* If the Inertia pot is being used for Chan5, the Bind button has no effect on Ch5 but is still used for Binding and toggling what the Inertia pot is used for.
RECEIVER PROGRAMMING with Tx72:
If the Inertia pot is used to control Ch4, Tx72 can change settings in some DT receivers (eg: Rx6x and Rx4x series). This creates a risk of unintended changes so care is needed. If the receiver is put into programming mode by mistake, simply switch the receiver off and center the Ch2 and Ch4 knobs before switching the receiver on.
APPROACH:
To enter programming mode:
1. Set the Inertia knob to control Ch4 (described above).
2. Rotate the Ch2 (Selecta) and Ch4 (Inertia) knobs fully left or right (not centered).
3. Center the Ch3 (Direction) switch.
4. Put Ch1 (Throttle) in the 'off' position.
5. Switch Tx72 on.
To make changes to receiver settings:
6. Switch ON a receiver which has previously been bound. The receiver led should flash fast within a few seconds.
7. Center the Ch2 (Selecta) and Ch4 (Inertia) knobs.
8. Toggle the Ch3 (Direction) switch left and center again to make 'NO' choices.
9. Toggle the Ch3 (Direction) switch right and center again to make 'YES' choices.
To disable programming capability:
10. Change the Inertia knob back to controlling Ch5 or Inertia (described above).